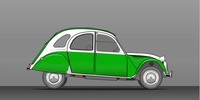
Ok, so I had a couple of hours spare this afternoon and I used that time to work on the painting. I found a photo of a car that I wanted to use as the 'model', and from that I made a fairly accurate drawing on the canvas in pencil.
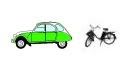
There are various ways of transferring your image to your canvas, some folks square up the photograph, then square up the panel and copy each square across, others use a projector and so on. I try to draw them in freehand as best I can because anything done using rulers and French curves to get right tends to look too mechanical, and more like a technical illustration than a painting. I also draw an old oil can, which is the first bit of 'junk' that I'll include in the painting.

I get the placement of the car about right on the canvas, bearing in mind that I have no idea what type of background I'm going to put in yet, I'm just going to make it up, and then add it around the car once it's in place. Working slowly and carefully I get the car drawn in pretty much exactly, the drawing still has flaws in it but at this stage I can change whatever I want to easily enough later.
Notice that I have now begun to indicate where the background will be, adding a window and back walls. It also occurred to me that the French love their corrugated metal sheets, so I placed one of those on top of the car. I like this stage because I can add whatever comes to mind. Finally, in a moment of humorous inspiration I added a wicker basket too, this alludes to Boulanger's famous
'basket of eggs' requirement for the car's original design.

I should speak a little here about perspective, as it is an absolutely crucial element in all representational paintings. Get it wrong and the illusion of reality is broken. As all paintings are done on a flat surface, yet are attempting to recreate depth and space a good working knowledge of the rules of perspective is pretty much mandatory.
Perspective is difficult, there are rules and mathematical formulas for it, and like both rules
and mathematics it's boring to discuss, - so I won't.

Only to add that for all the fancy-dan theories of geometry and mathematics I judge mine by eye, and if it looks right to me then that'll do.
Once it's all in and looking reasonable I begin the underpainting by using heavily diluted paint in a consistency almost like a watercolour. Notice that I don't paint in the lines but concentrate more on the negative shapes. What are negative shapes? Ok, imagine that you have a polo mint, and you put it on a canvas. You then paint around its circumference, and finally in the hole in the middle. When you remove the mint you are left with a painting of its negative shapes, i.e. the bits where it wasn't, those are negative shapes.

Many inexperienced painters begin by outlining their drawing which is not the best way to do it simply because it wastes time. Indicating the shadows by painting in the negative shapes as shown here allows you to quickly develop both a sense of light and of form.

The reason for using the toned ground will also soon become apparent, as it is now used to work out the fall of light that would normally have been done at the 'thumbnail' sketches stage, but of course I didn't do any!

So far I have used the mid toned ground that I added to the white to indicate the middle strengths of the tones, I did this because when starting with a white ground there is only one direction that a painter can go, and that is darker. With a mid tone ground it is possible to work in either direction - dark or light, and thus quickly achieve a three dimensional rendering with minimal effort.
In the final photo below you will see that having added where the shadows will be, I then switch to a lighter grey and indicate where the light will be. Starting at the window which is the source of the light I am able to imagine where that light would fall and place a lighter tone on the canvas in those places.

I imagine where the car would be bathed in light, and where in shadow, and develop those two opposing areas, and all the while the mid tone grey canvas serves as the main body of the underpainting. I had originally drawn the car slightly low at the rear due to my intending to account for the weight of junk that I would subsequently pile on top of it, but as there isn't much the rear wheel looks wrong. The solution was to add more junk, but as I'm happy with what's on top already I placed a French milk churn in front of the rear wheel so it looks correct again!

I stop here and allow it to dry, I'll post again when I've done another sitting and moved it on some more.